By Adrian Warren
5. Cables
Aerial track ways. Back in the early 1980s, Neil Rettig and I experimented with ways to move a camera horizontally through the tropical rain forest canopy. He already had a lot of experience in climbing up to the rain forest canopy, and together we had worked out some techniques for obtaining vertical tracking shots, using pulleys, with some very smooth and pleasing results.
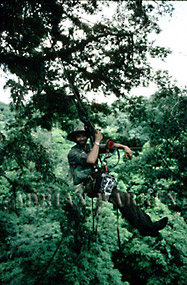 |
Neil Rettig on horizontal rope in Costa Rica |
Moving the camera horizontally though proved to be a much bigger problem. To start with, we employed climbing rope. The problem was that it stretches alarmingly (even non-stretch caving rope), so that when one cast oneself off a tree platform, suspended by a pulley, the initial part of the ride was almost vertical before shooting off sideways. Needless to say, it was difficult to hold a camera steady during this experience. Finally one came to a halt halfway across the span and it was necessary to laboriously haul oneself back using jumars. The other thing about this was that it was not very safe. While climbing rope is very strong and is perfectly adequate when a person is suspended vertically, as soon as it is stretched horizontally to form a span, its breaking strain is reduced alarmingly.
So we started using steel cable, which was much more successful, using hand winches to tighten it between two stout trees. We rigged the cable at an incline of about four degrees, to give a little gravitational speed, but not too much when one cast off from the platform on a seat suspended by pulleys. In those early experimental days we did not use brakes, only outstretched feet to lessen the impact on the tree at the lower end. Neil became something of an expert at this technique, producing some beautiful shots filmed at 75 fps.
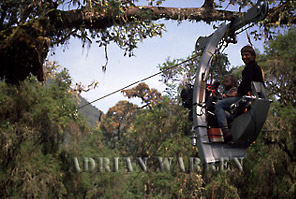 |
IMAX aerial dolly system |
The real challenge came when we were making an IMAX film on Mountain Gorillas. With a huge camera weighing in at 120 lbs we obviously had to design a much stronger system than we had employed to date, and this time with brakes designed from bicycle parts. The result was a cable car built from carbon fibre, able to carry two persons plus the camera.
THE HAND-HELD CAMERA
With the door off, filming can be a cold and windy exercise. Everything you are using, including you, needs to be tied off to a safety harness, normally attached via a screw gate karabiner to a strong point in the aircraft such as the seat belt attachment ring on the floor. For your own security and comfort, use a full body harness but one with a loose enough fit so as not to restrict your comfort and movement. If you haven't experienced it before the power of the air stream may come as a surprise, so it's better not to have to lean too far out. It is difficult enough to try to compensate for all the bumps, rocking motion and vibration. Some camera operators use miniature gyro-stabilisers, which can help to smooth out some of these difficulties but they also introduce problems of their own; firstly they are heavy and require their own power supply, and, secondly, they make it very difficult to move the camera from a fixed position without jerking it. In a fixed wing aircraft such as a Cessna, I tend to use one of the seats to brace myself and the camera from a kneeling position on the floor. In the case of helicopters, a crudely attached criss-cross of bungee cords can help to take the weight of the camera and relieve at least some of the vibration. Helicopters tend to slew, or "fish-tail", especially at slow speeds, so you have to compensate for that too.
EXTERIOR MOUNTS
Exterior mounts put the camera in a remote position on the air frame where it can achieve a view otherwise impossible to obtain from inside the aircraft. This also means that it is not only impossible for the camera operator to look through the viewfinder, but it is also impossible for him to manually compensate for any unsteadiness in the flying due to air conditions. The camera operator may have a certain amount of control from a console inside the cockpit but because the camera is locked on to the aircraft, it is the pilot who essentially "flies" the shot. It can, therefore, be much more difficult to achieve excellence in a shot from an exterior mount although, when they work, the unusual angle can be visually very satisfying. This is particularly the case with forward facing exterior mounts.
Tyler Camera Systems supply a nose mount, designed to fit on to the outside of a helicopter for shooting straight ahead, for a flight "point-of-view" in which the horizon rolls as the helicopter banks. It incorporates a vertical tilting capability, controlled remotely from inside the aircraft incorporating a video screen. The use of video is really essential for nose mount shots, since playback can help everyone review framing and execution of the shot. Again, these mounts are expensive to hire, and heavy to ship around the world.
Wescam, and Spacecam Systems, supply similar, sophisticated gyro-stabilised camera systems, built into domes that can be mounted not only on to helicopters, but also boats, cars and other moving vehicles. They are very versatile and have been used widely in feature film and commercials production. The rental cost would probably exclude its use for most wildlife film productions, being around US $2,500 per day for the equipment, and they require specially trained technicians to operate them.
It should be noted that fitting aircraft with special mounts normally requires a CAA/FAA certificate of air worthiness (C. of A.), especially for any device that is fitted to the exterior of the airframe. This is purely a safety consideration. Anything that is attached to the outside of an airframe will undoubtedly affect the flying efficiency of the aircraft and of course there is always the risk of it falling off. Attaching a device without approval runs the risk of annulling the aircraft's insurance with obvious disadvantages should anything go wrong.
If you are looking for more economical ways to achieve exterior mount shots, for many years now, there has been a small lightweight, clamp device which has made it possible to place a camera on the wing strut of a Cessna for forward facing shots, with the only disadvantage that the camera position was not only fixed, but the use of a wide angle lens was limited by the propeller. Anything wider than about 8 mm. runs the risk of bringing the propeller blades into shot on the left hand edge of a super-16mm frame. As far as I know, this device was never formally approved by either the CAA or the FAA, although it has been widely used by a number of camera operators. It is true to say that the simplicity of this device means that there is not much that can go wrong, providing it is attached to the wing strut carefully. The disadvantage is that unless there is a video assist capability it is impossible to know, once airborne, if an insect has ended its life as a splodge on the lens, prior to running the camera.
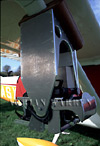
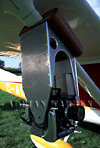
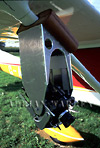
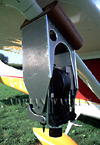
Thinking about these limitations, and the high cost of commercially available forward facing mounts, I have felt for a long time that there is a need for one, suitable for 16mm, that will do everything that, for example, a sophisticated Tyler nose mount will do, but which will fit on to the wing strut of a single engine Cessna aircraft. Cessna's are, after all, usually readily available in most of the remote locations that we work in, and a much cheaper option than a helicopter. So, I decided to design a mount, based on the small and lightweight clamp idea which uses wooden blocks moulded to fit the contours of a Cessna wing strut, but with the specifications to be simple, lightweight, and small (therefore very portable).
(Wing strut mount for Cessna) Quicktime movie clips of our aerial footage using this wing mount camera system
The result is the MOVING CAMERA WING MOUNT. From a prototype Mark I which we field tested on a film shoot in Tanzania, we quickly moved on to build a Mark II version, which not only accommodates 16 mm. Film cameras, but also 35 mm. and Video (including High Definition). The camera no longer sits on top of the wing strut, where its position relative to the wing undersurface was limited, but instead, the camera is now under-slung. The advantage of under slinging the camera means that it can be supported in a cradle that tilts through 100 degrees between forward facing and vertical with a smooth geared motor to execute in-vision moves. Everything is controlled from within the cockpit, including a motorised lens shield (a key feature of the mount which protects the lens from dirt and insects); tilt movement with variable speed; camera frame speed; iris control; camera run; and a video monitor with record facility shows what the camera sees. The Mark II delivers smooth, vibration free shots even when filming at 24 or 25 frames per second. This mount, which has now flown over 300 hours for experimental testing on Cessna 172, 182, and 206 aircraft, is the subject of three filed patents, and is presently under application to obtain full CAA and FAA approval for a certificate of air worthiness.
For more details of the MOVING CAMERA WING MOUNT please contact us at Last Refuge Ltd.
There are, in fact, many other ways in which cameras have been mounted on to the exterior surfaces of aircraft, especially if the camera is small and lightweight. Cameras have been put on wings, tail fins and the fuselage of various aircraft, from old DC-3s to aerobatic machines, and they can deliver exciting shots, but extreme care must be taken to ensure that the camera will not fall off; the camera mounting does not hinder any aircraft control surfaces; or in any way affect the safe performance of the aircraft. It should also be noted again that mounting non-approved equipment on to the exterior of any airframe is non-standard and therefore nullifies the aircraft insurance. It should also be noted that pilots and aircraft owners quite understandably do not like holes being drilled in their aircraft, and do not appreciate the paintwork being stripped off by the strong adhesive on gaffer and camera tape. REMOTE CONTROL AIRCRAFT
Cameras may also be mounted in specially built remote aircraft, from fixed wing versions, to helicopters, to helium filled blimps. Helicopters are probably the most popular, and have been used extensively for commercial and feature film work. If you think it is a cheap option, though, to go for a remote control aircraft rather than a full size one, think again - it can work out very expensive. The advantage comes if you want a specific shot that would not be possible in a full size machine; for example, if you want the camera to fly through a window, or perhaps an aerial view inside a building, then a remote control machine is the way to go.
And, finally...
Aerial Filming is a vast subject, and I have barely scratched the surface here. Please contact us here at Last Refuge Ltd. If you would like further advice, or help in achieving your aerial shots...